Page 79 - DMGT206_PRODUCTION_AND_OPERATIONS_MANAGEMENT
P. 79
Production and Operations Management


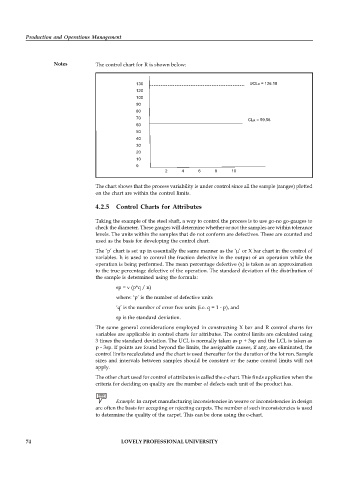
                    Notes          The control chart for R is shown below:


                                                 130                                     UCLR = 126.18
                                                 120
                                                 100

                                                 90
                                                 80
                                                 70
                                                                                        CLR = 59.56
                                                 60
                                                 50
                                                 40
                                                 30
                                                 20

                                                 10
                                                 0
                                                           2     4     6     8    10

                                   The chart shows that the process variability is under control since all the sample (ranges) plotted

                                   on the chart are within the control limits.

                                   4.2.5  Control Charts for Attributes

                                   Taking the example of the steel shaft, a way to control the process is to use go-no go-gauges to
                                   check the diameter. These gauges will determine whether or not the samples are within tolerance
                                   levels. The units within the samples that do not conform are defectives. These are counted and
                                   used as the basis for developing the control chart.
                                   The ‘p’ chart is set up in essentially the same manner as the ‘µ’ or X bar chart in the control of
                                   variables. It is used to control the fraction defective in the output of an operation while the
                                   operation is being performed. The mean percentage defective (x) is taken as an approximation
                                   to the true percentage defective of the operation. The standard deviation of the distribution of
                                   the sample is determined using the formula:
                                          sp = v (p*q / n)

                                          where: ‘p’ is the number of defective units
                                          ‘q’ is the number of error free units (i.e. q = 1 - p), and
                                          sp is the standard deviation.
                                   The  same general  considerations employed in  constructing  X bar  and R control charts  for
                                   variables are applicable in control charts for attributes. The control limits are calculated using
                                   3 times the standard deviation. The UCL is normally taken as p + 3sp and the LCL is taken as
                                   p - 3sp. If points are found beyond the limits, the assignable causes, if any, are eliminated, the
                                   control limits recalculated and the chart is used thereafter for the duration of the lot run. Sample
                                   sizes and intervals between samples should  be constant or the same control  limits will not
                                   apply.
                                   The other chart used for control of attributes is called the c-chart. This finds application when the
                                   criteria for deciding on quality are the number of defects each unit of the product has.


                                          Example: In carpet manufacturing inconsistencies in weave or inconsistencies in design
                                   are often the basis for accepting or rejecting carpets. The number of such inconsistencies is used
                                   to determine the quality of the carpet. This can be done using the c-chart.


          74                                LOVELY PROFESSIONAL UNIVERSITY

