Page 220 - DMGT524_TOTAL_QUALITY_MANAGEMENT
P. 220
Unit 14: Statistical Process Control


               Viscosity                                                                        Notes
               Tensile Strength
               Capacitance
          Step 2: Decide the number of units, n to be taken in a sample.


             Notes The minimum sample size should be 2. As the sample size increases then the
            sensitivity i.e. the quickness with which the chart gives an indication of shift of the process
            increases.

          However, with the increase of the sample size cost of inspection also increases.
          Generally, n can be 4 or 5.
          Step 3: Collect data on a special control chart data
          Collection sheet (Minimum 100 observations)

          The data collection sheet has following main portions:
          1.   General details for part, department, etc.
          2.   Columns for date and time sample taken
          3.   Columns for measurements of sample

          4.   Column for mean of sample
          5.   Column for range of sample
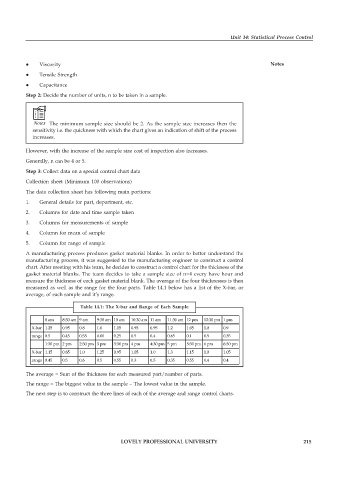
          A manufacturing process produces gasket material blanks. In order to better understand the
          manufacturing process, it was suggested to the manufacturing engineer to construct a control
          chart. After meeting with his team, he decides to construct a control chart for the thickness of the
          gasket material blanks. The team decides to take a sample size of n=4 every have hour and
          measure the thickness of each gasket material blank. The average of the four thicknesses is then
          measured as well as the range for the four parts. Table 14.1 below has a list of the X-bar, or
          average, of each sample and it’s range.

                             Table 14.1: The X-bar and Range of Each Sample

                 8 am   8:30 am  9 am   9:30 am  10 am   10:30 am  11 am   11:30 am  12 pm   12:30 pm  1 pm
            X-bar  1.25  0.95  0.8  1.0  1.15  0.95   0.95  1.2    1.05  1.0   0.9
            range 0.5  0.45  0.55  0.00  0.25  0.5    0.4   0.65   0.1   0.5   0.35
                 1:30 pm  2 pm   2:30 pm  3 pm   3:30 pm  4 pm   4:30 pm  5 pm   5:30 pm  6 pm   6:30 pm
            X-bar  1.15  0.85  1.0  1.25  0.95  1.05  1.0   1.3    1.15  1.0   1.05
            range 0.45  0.5  0.6   0.5   0.55  0.3    0.5   0.35   0.55  0.4   0.4

          The average = Sum of the thickness for each measured part/number of parts.
          The range = The biggest value in the sample – The lowest value in the sample.
          The next step is to construct the three lines of each of the average and range control charts.


                                           LOVELY PROFESSIONAL UNIVERSITY                                   215

