Page 239 - DMGT524_TOTAL_QUALITY_MANAGEMENT
P. 239
Total Quality Management


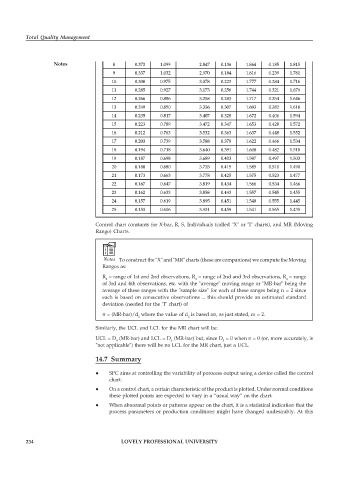
                    Notes                8      0.373    1.099         2.847   0.136   1.864   0.185   1.815
                                         9      0.337    1.032         2.970   0.184   1.816   0.239   1.761
                                        10      0.308    0.975         3.078   0.223   1.777   0.284   1.716
                                        11      0.285    0.927         3.173   0.256   1.744   0.321   1.679
                                        12      0.266    0.886         3.258   0.283   1.717   0.354   1.646
                                        13      0.249    0.850         3.336   0.307   1.693   0.382   1.618
                                        14      0.235    0.817         3.407   0.328   1.672   0.406   1.594
                                        15      0.223    0.789         3.472   0.347   1.653   0.428   1.572
                                        16      0.212    0.763         3.532   0.363   1.637   0.448   1.552
                                        17      0.203    0.739         3.588   0.378   1.622   0.466   1.534
                                        18      0.194    0.718         3.640   0.391   1.608   0.482   1.518
                                        19      0.187    0.698         3.689   0.403   1.597   0.497   1.503
                                        20      0.180    0.680         3.735   0.415   1.585   0.510   1.490
                                        21      0.173    0.663         3.778   0.425   1.575   0.523   1.477
                                        22      0.167    0.647         3.819   0.434   1.566   0.534   1.466
                                        23      0.162    0.633         3.858   0.443   1.557   0.545   1.455
                                        24      0.157    0.619         3.895   0.451   1.548   0.555   1.445
                                        25      0.153    0.606         3.931   0.459   1.541   0.565   1.435

                                   Control chart constants for X-bar, R, S, Individuals (called "X" or "I" charts), and MR (Moving
                                   Range) Charts.


                                     Notes To construct the "X" and "MR" charts (these are companions) we compute the Moving
                                     Ranges as:
                                     R  = range of 1st and 2nd observations, R  = range of 2nd and 3rd observations, R  = range
                                      2                               3                              4
                                     of 3rd and 4th observations, etc. with the "average" moving range or "MR-bar" being the
                                     average of these ranges with the "sample size" for each of these ranges being n = 2 since
                                     each is based on consecutive observations ... this should provide an estimated standard
                                     deviation (needed for the "I" chart) of
                                     σ = (MR-bar)/d  where the value of d  is based on, as just stated, m = 2.
                                                  2                2
                                   Similarly, the UCL and LCL for the MR chart will be:

                                   UCL = D  (MR-bar) and LCL = D  (MR-bar) but, since D  = 0 when n = 0 (or, more accurately, is
                                          4                  3                 3
                                   "not applicable") there will be no LCL for the MR chart, just a UCL.
                                   14.7 Summary


                                       SPC aims at controlling the variability of porocess output using a device called the control
                                       chart.
                                       On a control chart, a certain characteristic of the product is plotted. Under normal conditions
                                       these plotted points are expected to vary in a “usual way” on the chart.
                                       When abnormal points or patterns appear on the chart, it is a statistical indication that the
                                       process parameters or production conditions might have changed undesirably. At this


          234                               LOVELY PROFESSIONAL UNIVERSITY

